

Restoring the interior of a vintage car is a rewarding endeavor that allows automotive enthusiasts to breathe new life into classic vehicles. One of the key components of this process is the upholstery, which not only enhances the aesthetic appeal but also contributes to the overall driving experience. Understanding the nuances of upholstery restoration is essential for achieving a professional-looking finish.
When tackling upholstery restoration, it’s important to start with a thorough assessment of the existing materials. This includes evaluating the condition of seats, headliners, door panels, and carpets. By identifying areas that require repair or replacement, one can create a comprehensive plan that ensures all aspects of the interior are addressed. Whether you’re dealing with delicate leather, faded fabrics, or worn-out foam padding, knowing how to properly handle these materials will make a significant difference in the final result.
Another crucial aspect of restoring vintage car interiors is selecting the right materials for upholstery. Authenticity is paramount for many collectors, so sourcing original fabrics and leathers can greatly enhance the value and appeal of the car. In some cases, however, modern alternatives may offer better durability and ease of maintenance. Balancing authenticity with practicality is a key consideration that every restorer must navigate.
Finally, the techniques employed in the restoration process play a vital role in achieving a flawless finish. From reupholstering seats to installing new headliners, mastering the appropriate techniques can elevate the project from mediocre to exceptional. Knowledge of sewing methods, adhesives, and tools will empower restorers to tackle any challenge confidently and with precision.
Selecting the Right Upholstery Materials for Vintage Cars
Choosing the proper upholstery materials is essential for restoring vintage car interiors. The right selection not only enhances the aesthetic appeal but also ensures durability and comfort. Here are key factors to consider when selecting materials:
- Authenticity: Aim for materials that match the original specifications of the car. Research the make and model to find historically accurate fabrics and leathers.
- Durability: Vintage cars often require materials that can withstand wear and tear. Consider options like high-quality leather or synthetic alternatives that mimic leather’s appearance while providing better resistance to fading and stains.
- Texture: The texture contributes significantly to the overall feel of the vehicle. Smooth finishes are suitable for luxury cars, while coarse textures may fit sporty models better.
- Color: Selecting the right colors is crucial for authenticity. Original color options can usually be found in vintage car restoration guides or community forums. Consider using swatches to compare colors before making a final decision.
Pay attention to specific areas of the interior, such as:
- Seats: Choose materials that can withstand daily use while providing comfort. Look for padded options that have a similar feel to the original fabric.
- Door Panels: The door panels should complement the seats and maintain a cohesive look. Ensure the material you choose can be easily molded to fit the contours of the doors.
- Dashboard: The dashboard material should be durable and resistant to UV rays to prevent fading. Vinyl or specialized automotive upholstery can provide the right balance of aesthetics and functionality.
- Headliner: The headliner material should offer insulation and sound dampening, while also matching the style of the rest of the interior.
Finally, don’t forget about maintenance requirements. Opt for materials that are easy to clean and maintain, as vintage cars will require more effort to preserve over time. By carefully selecting the right upholstery materials, you can restore your vintage car’s interior to its original glory while ensuring long-lasting comfort and style.
Step-by-Step Guide to Reupholstering Seats in Classic Vehicles
Reupholstering seats in classic vehicles can breathe new life into your cherished automobile. Here’s a comprehensive guide to ensure a successful process.
Step 1: Gather Materials
Before beginning, collect all necessary materials. These include new upholstery fabric, foam padding, adhesive spray, tools such as a staple gun, screwdrivers, pliers, and a sewing machine if custom stitching is needed.
Step 2: Remove the Seats
Carefully detach the seats from the vehicle. Most seats are secured with bolts underneath. Keep track of all screws and fasteners by placing them in a labeled bag.
Step 3: Disassemble the Seat
After removing the seat, take off the upholstery. Use a flathead screwdriver to pry off any staples holding the fabric in place. Take note of the original configuration, as this will guide the reupholstering process.
Step 4: Assess and Replace Foam
Examine the foam padding for wear and tear. If it’s flattened or damaged, replace it with new foam. Cut the foam to size and attach it to the seat base using adhesive spray for added support.
Step 5: Cut New Upholstery
Using the old upholstery as a template, cut the new fabric. Ensure you leave extra material for tucking and stapling. If your vehicle has a distinct design, consider aligning patterns carefully.
Step 6: Staple Fabric to the Seat
Starting from the center, pull the fabric taut and staple it securely to the underside of the seat. Work your way to the edges, ensuring there are no wrinkles for a smooth finish. Reinforce corners and seams for durability.
Step 7: Reattach Components
Once the fabric is secured, reattach any components like armrests or seatback adjustments. Ensure everything is in good working order before proceeding.
Step 8: Reinstall the Seats
Carefully place the newly upholstered seats back into the vehicle. Align the seat brackets with the pre-drilled holes and secure them with the original screws. Double-check that the installation is stable.
Step 9: Final Touches
Inspect the completed installation for any loose areas and make adjustments as needed. Clean the surrounding areas, including the dashboard, to enhance the overall appearance of the interior.
Step 10: Enjoy Your Classic Vehicle
Your hard work has paid off! Take a moment to admire the revitalized seats and experience the comfort and beauty of your classic vehicle’s interior.
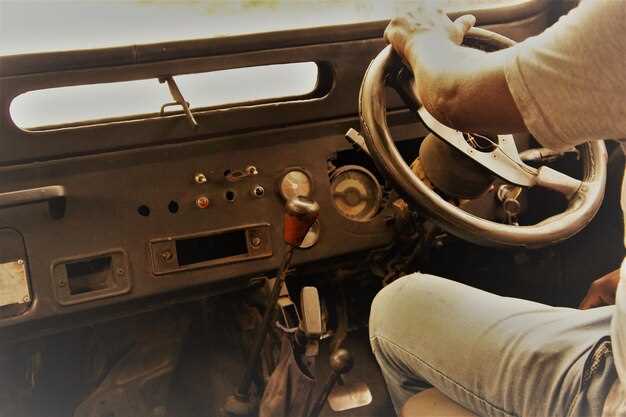
Refurbishing Your Dashboard: Techniques for a Factory-Fresh Finish
Refurbishing your dashboard can significantly enhance the overall aesthetic of your vintage car. Achieving a factory-fresh finish requires attention to detail and the right techniques. Start by assessing the condition of your dashboard, focusing on areas that show wear, cracks, or discoloration.
Cleaning and Preparation: Begin with a thorough cleaning. Use a soft cloth and a mild cleaning solution to remove dust and grease, ensuring that all surfaces are free of contaminants. For stubborn stains, consider using a gentle scrub brush, paying special attention to textured areas. Once cleaned, dry the dashboard completely before proceeding to any refinishing steps.
Repairing Damages: Address any cracks or holes in the dashboard using appropriate fillers. Vinyl repair kits often include materials that can restore the surface effectively. Apply the filler carefully, allowing it to cure according to the manufacturer’s instructions. After curing, sand the area smoothly to ensure it blends seamlessly with the surrounding material.
Upholstery Considerations: If your dashboard features upholstery elements, such as padded sections or vinyl coverings, inspect these areas for signs of wear. Reupholstering may be necessary if the material is significantly damaged. Remove the old upholstery carefully, taking care not to damage the underlying frame. Attach the new upholstery using adhesive or staples, ensuring a tight and smooth fit.
Painting and Finishing: To achieve a glossy, factory-fresh look, consider repainting the dashboard. Use high-quality automotive paint suitable for plastic and vinyl surfaces. Apply primer first, then follow with several coats of paint, allowing each coat to dry thoroughly. Finish with a clear coat for added durability and shine.
Final Touches: Reinstall any knobs, buttons, and trim pieces you may have removed during the refurbishing process. Ensure all components are clean and functioning properly. For the final presentation, consider conditioning the materials with a suitable product to restore their natural luster and protect against future wear.
By following these techniques, you can restore your dashboard to a factory-fresh finish, enhancing both the visual appeal and value of your vintage car.